
Creating a successful website requires more than just coding—it’s a structured, step-by-step process that ensures your site is functional, user-friendly, and aligned with your business goals. Whether you’re building a business website, an eCommerce platform, or a personal blog, understanding the web design and development process is essential.
In this guide, we’ll walk you through each phase of website development—from the initial planning stages to the final launch.
The Website Development Process
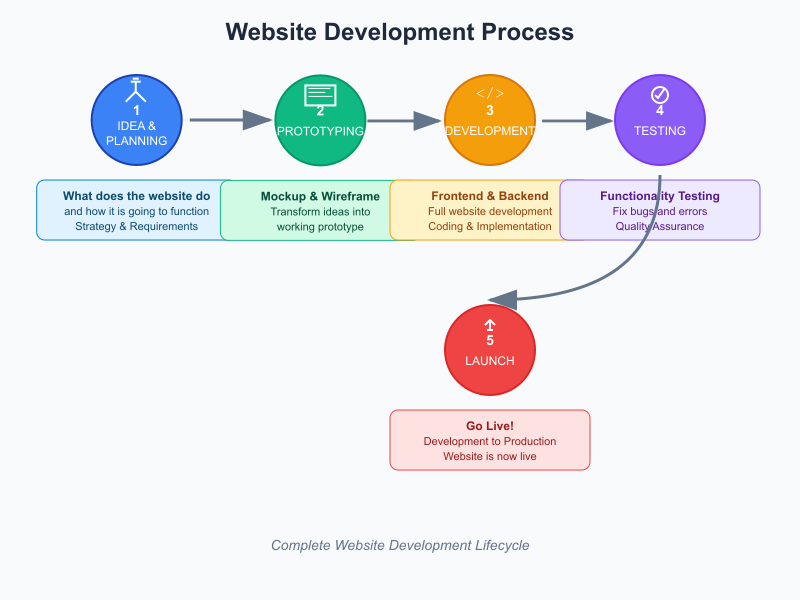
1. Idea & Planning

Every great website starts with a clear idea and solid planning. In this phase, key questions are asked:
- What is the purpose of the website?
- What is the type of website?
- Who is the target audience?
- What features and functionalities are needed?
- What type of content will the website include?
This step involves defining the website goals, identifying user needs, and mapping out a site structure (sitemap). You need to be very detailed and specific of what needs to be created.
In this stage you can suggest a website to draw inspiration from.
Proper planning reduces costly revisions and ensures that the final product meets both user and business expectations.
2. Prototyping & Wireframes
Once the vision is defined, the next step is prototyping.
This involves creating:
- Wireframes: Simple sketches that outline the page structure.
- Mockups or Prototypes: Interactive models showing how users will interact with the site.
This phase helps visualise the layout, user interface, and user journey before any coding begins. It’s a collaborative step between designers, developers, and you to ensure everything aligns before moving to development.
3. Development (Frontend & Backend)

With the prototype approved, we begin full website development.
This includes:
- Frontend Development: Coding the visible parts of the site using HTML, CSS, JavaScript, etc.
- Backend Development: Building server-side functionality, databases, and content management systems (CMS) like WordPress.
During this phase, the site becomes interactive, responsive, and functional across devices.
4. Testing & Debugging

Before launch, thorough website tests are conducted to ensure quality.
Testing includes:
- Functionality Testing
- Compatibility Across Browsers & Devices
- Performance & Speed Optimization
- Fixing bugs, broken links, or design inconsistencies
- Validate SEO elements such as meta tags, alt texts, and mobile responsiveness to enhance visibility on search engines.
5. Launch & Deployment

Once testing is complete, it’s time to launch the website.
The site is migrated from the development environment to the live server, making it accessible to the public. After launch, quality and performance are checked to ensure everything is running smoothly.
This is also the perfect time to initiate a future website maintenance plan to keep things up to date.
Final Thoughts
A professional website doesn’t happen by chance. The above process ensures your website will be successful and long-lived.
Learn more
This page was written with the assistance of AI. Read more about our AI usage policy
Need help creating your website?
We specialise in company websites, custom websites, eCommerce stores, blog platforms, and more.